About 45 comfort caps were delivered this week. The majority (35) were delivered to the cancer center, where patients receive their chemo treatments, in the same building that houses the radiation center. A nurse friend told me about the chemo treatment center, that they might really have more need than the radiation center, so I took her advice. The person in charge was very appreciative of the donations of caps. Next stop was the radiation center. My contact person was also very appreciative of the cap donation.
Today, was our Sew What! community sewing class at the library, and I reported to the ladies about how well their comfort caps were received. Three of them brought more caps that they had made at home - 29 in all! Way to go, sewing students! We'll make some more at our June or July meeting out of cotton knit for summer wear that won't be hot, but will keep the wearer's head comfortably warm in air conditioning. I'll post photos of the caps soon.

Welcome to my sewing blog! I'll be showing photos and talking about some of the sewing and serger projects I teach at Austin's Sewing Center, at the local public library, at other locations, or have made just for my own enjoyment. God has blessed me with the gift of sewing and I love to share it with everyone. Hopefully, you will be blessed by what you see and read here! Thank you for visiting. (To see a close-up view of each photo, just click on it for a larger size.)
Thursday, March 24, 2011


Thursday, March 10, 2011
More Comfort Caps Sewn and Serged!
Yesterday was another work day as a Master Volunteer at our Extension Service office. There were five of us who were able to attend. We made 30 more caps in less than 3 1/2 hours! I'll be taking them to the radiation center to donate to anyone who needs a warm covering on their sensitive skin. I pray that through these caps, that were made with loving hands, God will bless the wearers and give them a comforting sense that there are people who really care about them and their well-being.
Friday, March 4, 2011
Please Leave me Some Feedback
I am really new to blogging and am wondering how I'm doing. If you would, please, leave me a comment or check off a reaction at the bottom of the post(s) you read to give me some feedback, OR become a follower of my blog, I would greatly appreciate it. I'm seeing that my blog is being read by people world-wide, which is so exciting! Now, I'd like to know how I'm coming across. Thank you for giving me your encouragement/feedback and let me know what you'd like for me to write about.
Also, I'm thinking about creating some kind of sewing or serger challenge. Put your thinking cap on and give me some ideas, such as "How many handmade creations can you make in a month?" "Serger project of the week," "Who has the most sewing patterns in their resource center (a.k.a. stash)?" "What do you call your fabric and pattern collection/stash/resource center?" or something else that would be fun. Thanks!
Also, I'm thinking about creating some kind of sewing or serger challenge. Put your thinking cap on and give me some ideas, such as "How many handmade creations can you make in a month?" "Serger project of the week," "Who has the most sewing patterns in their resource center (a.k.a. stash)?" "What do you call your fabric and pattern collection/stash/resource center?" or something else that would be fun. Thanks!
Thursday, March 3, 2011
Sewing and Serging Comfort Caps at Sew What!
Our Sew What! Community Sewing group had a service project sewing day for our February meeting on the 24th. There were 10 regulars and one visitor who came to learn how to sew Comfort Caps (chemo caps) for the radiation center at Baptist Hospital East. 17 caps were sewn, some were embellished with hand-made fabric flowers (from a lesson I taught last fall), purchased ribbon flowers, rick-rack and buttons. All were serged around the outer edge, which allowed us to use only one layer of polar fleece and no lining.


 The ladies had so much fun sewing the caps and consulting with each other on how to decorate their individual creations! Everyone did a wonderful job sewing their caps, and most made at least two caps each! We will do another service project in about three months, and will probably make more Comfort Caps out of cotton knit fabric for warmer weather.
Our project for March will be a lesson on how to put in invisible and regular zippers. We meet at the Jeffersontown Public Library on Watterson Trail on the fourth Thursday of the month, January through October, from 1 - 3:30 p.m. If you live in the Louisville area, please join us for a fun afternoon of sewing with friends and new friends!


Our project for March will be a lesson on how to put in invisible and regular zippers. We meet at the Jeffersontown Public Library on Watterson Trail on the fourth Thursday of the month, January through October, from 1 - 3:30 p.m. If you live in the Louisville area, please join us for a fun afternoon of sewing with friends and new friends!
Sunday, February 6, 2011
How to Keep our Sewing Machines Clean and Running Smoothly

I took the throat plate off, took out the needle, unscrewed the presser foot ankle and removed it along with the presser foot. I opened the bobbin assembly area door and took out the bobbin case. Next, I lowered the feed teeth so I could clean out any lint and dust that had accumulated in that area.
I raised the presser foot and turned the tension dial to zero. A folded piece of fine muslin can be slid from top to bottom in between the tension discs to clean out any dust/lint (suggested by Threads Magazine), or a length of small gauge crochet thread can be run through the tension discs in the same manner. The crochet thread is larger than regular sewing thread and it will remove hunks of dust/lint from the tension disc area. This downward movement allows the dust/lint to be pulled out to the bottom of the disc assembly, and not push it back into the area. When re-threading your machine, after cleaning is completed, remember to re-set the tension dial to an appropriate setting for your next project.
TIP: When changing thread, cut it above the tension disc assembly then pull it out through the needle area to remove it, thereby pulling out any accumulation of dust/lint in that area (and not pulling it back up into the tension discs).
Next, I dipped the machine cleaning brush into some rubbing alcohol,and squeezed out the excess. Alcohol makes the brush attract dust/lint better and allows me to pull clumps of it out of the machine.
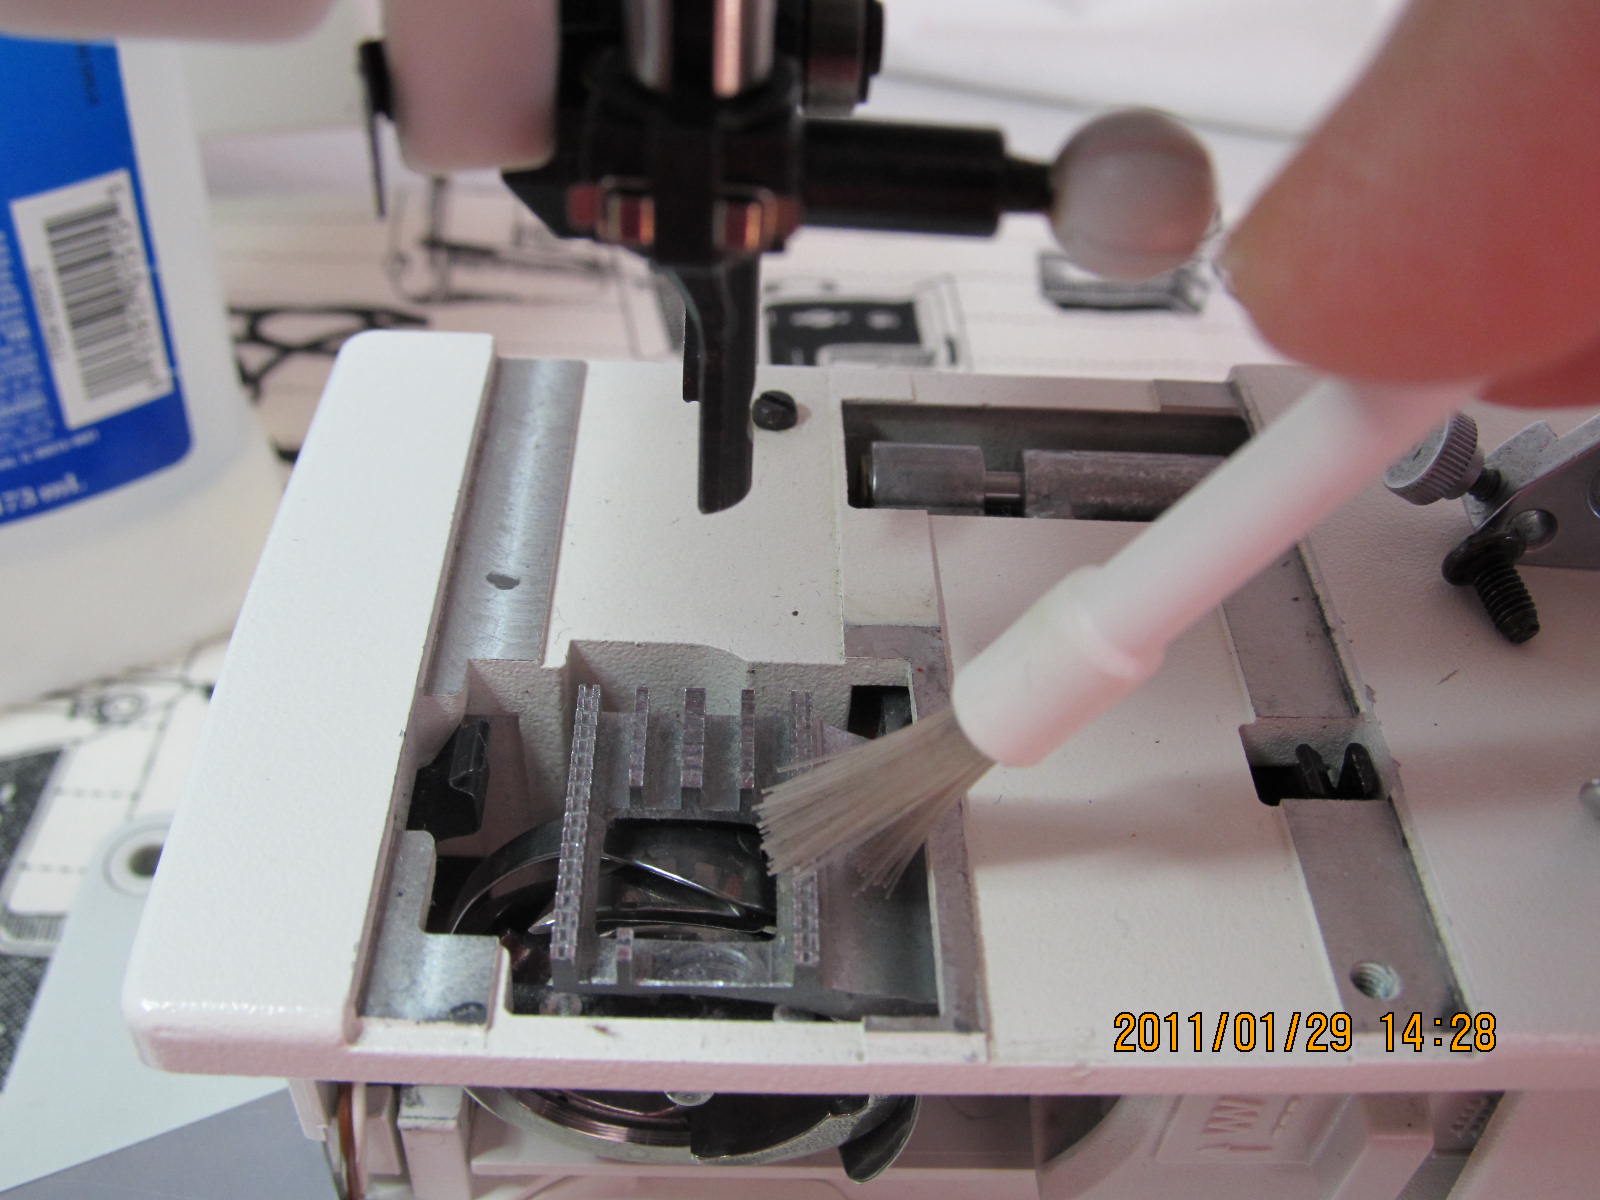
This shows how easy it is to clean out the feed teeth area. Also, on my machine, I hold my brush on the top of the bobbin hook race assembly (seen above), while I turn the handwheel to clean off that area.

The presser bar needs attention, too! Sometimes, lint/dust can accumulate in this area. It usually won't affect the machine's ability to stitch properly, but just for the principle of it I like to clean this area.

If you have a special attachment that fits on your vacuum cleaner, you can use it to vacuum out all of the dust and lint inside your machine. You know, the kind that is used for cleaning computer keyboards. It has two sizes of small brush extensions and a small crevice extension. I have found that this attachment makes cleaning my machine so much easier, and it does a more thorough job. This is a good time to vacuum every area that is exposed. I like to vacuum-dust the outside of my machine, also. Oh, and don't forget, vacuum-dust the foot pedal. Dust can accumulate inside it, as well, and can affect how it operates.
I DO NOT recommend using a product called "canned air" to blow dust/lint out of sewing machines. I don't like that it could blow everything further into the machine, making it nearly impossible to remove. NEVER, never blow your breath into your machine, for any reason! You're blowing moisture into the machine which can cause corrosion or rusting. Not good!

If your hook race assembly can be removed, wipe it off with the soft cloth that has a tiny drop of oil on it. Use a good quality sewing machine oil, not household oil. Sewing machine oil is a specially formulated, petroleum-based oil made for sewing machines and is a light oil. Household oil is a heavier oil. Some oils can actually cause corrosion and build-up inside the machine. Remember, less is more (in this case)!
Some older machines have holes in the throat plate area where a drop of oil can be placed, but most newer machines do not have this option. After the machine is completely cleaned and put back together, but before threading the top thread, run it at top speed for about a minute to distribute the oil evenly in the bobbin assembly.
Unless your machine instruction manual specifically tells you NOT to oil your machine, you can give it ONE drop of oil in the bobbin area. My machine had been sounding a little loud until I put in the oil. Now, it sounds much more quiet and has a smooth-running sound.


TIP: Never, never sew over pins!!!!!! The needle could strike a pin and break! The needle fragments can fly into your eye, or can damage your sewing machine. Metal shavings can accumulate in the bobbin area and can cause problems. Sewing over pins can dull the point of the needle or cause a burr, shortening its life and causing faulty stitch formation. Just get out of the habit of sewing over pins, if you have that habit, please!
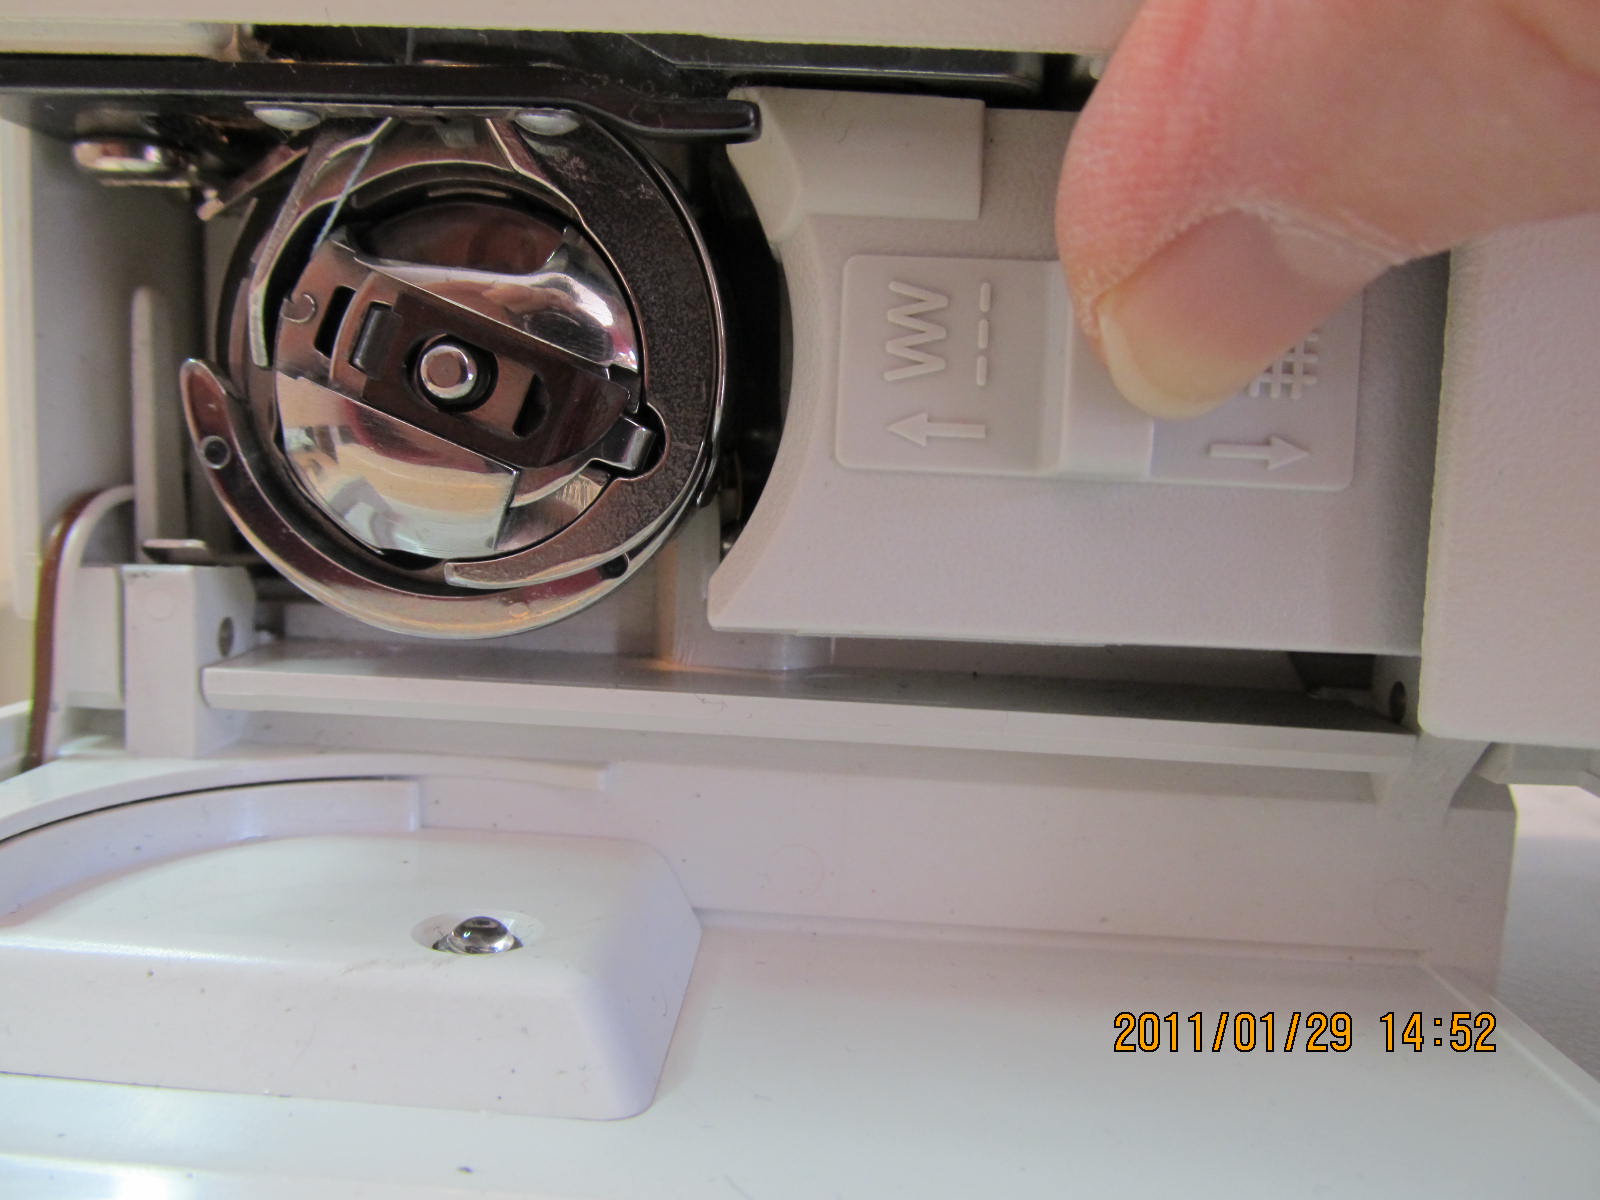
Be sure to raise the feed teeth back into the sewing position. I can't tell you how many times I have forgotten to raise my feed teeth! The sewing machine will not sew forward unless the feed teeth are in the up position.
If you follow the steps I've suggested to clean and maintain your sewing machine after every six to eight hours of sewing, or even after each project, you'll have fewer issues with your machine, fewer stitch problems and a much smoother-running sewing machine. Form a new habit and do a quick cleaning with your brush before starting every new project.
The six to eight hour rule of thumb is good to follow for changing the needle, as well. Don't wait until your needle gets so dull that it prevents good stitch formation, or when your needle gets bent or gets a burr on it. Purchase several packs of needles when notions are on sale at your local dealership or fabric store, so you'll have a supply on hand.
My recommendation is to keep your machine(s) covered when not in use. I use vintage pillow cases that have pretty embroidery on them to just place over my sewing machines and my serger. They don't really "fit" onto the machines, so I just lay them over the top of the machines. It works!
Before beginning a cleaning session, check your machine instruction manual for specific instructions on how to take everything apart, and if/where to oil your machine. Keep in mind that too much oil can spread into the wiring of a sewing machine, which will cause a new set of problems. So, be cautious when oiling!
Cleaning your serger is similar to what I've described here. I especially like to use my vacuum attachment to pull out all of the dust/lint from around the loopers and the feed teeth areas. It's fast and works very well!
Threads Magazine recommends taking your machine to your dealership or authorized mechanic every two years for a tune-up. My experience has been that by keeping my machine clean, as outlined here, it cuts down on the number of times I have to take my machine in for tune-ups.
I hope you have enjoyed this mini-lesson on machine cleaning. I love hearing the smooth, "purring" sound of my machine when it's thoroughly clean - kind of like being able to see clearly through a freshly washed window on a sunny day!
Please leave me a comment, below, if you have any questions, or to tell me if this tutorial is not understandable. Thank you!

Monday, January 17, 2011
Comfort Caps and Baby Blankets


Our Master Clothing Workday was a great success today! There were 11 or 12 volunteers who made 58 comfort caps (chemo caps) and 10 baby blankets for our community service sewing project. We had an assembly line going. Some cut out caps, some sewed caps, some serged caps. I serged a 3-thread balanced stitch around the outer edge and some tied off the ends of the thread chains and hid them in the seam. We spent about 4 hours completing our projects, while visiting with each other, catching up on our activities since our November training.
We had a very nice lunch, then grouped together for our "show and tell" session, presenting and discussing projects we made in our individual classes at training and some other projects we've worked on since we were together last.
Our group is made up of wonderfully talented, experienced and qualified volunteers. Together, we log an enormous number of volunteer hours teaching others in our communities to sew. Some of our volunteers work with children through the 4-H program and others work with adults. We all have a love of sewing and teaching others the skills we've acquired, and thoroughly enjoy our work with the Master Clothing Volunteer program.
I plan to give these two caps to a high school classmate who was recently diagnosed with colon cancer and has been undergoing chemo treatments. I hope she likes them and they give her some comfort.
Master Clothing Volunteer Work Day
Tomorrow is our semi-annual Master Clothing Volunteer work day at the Shelby County Cooperative Extension Service Office. We'll be working on two community service projects: comfort caps and baby blankets. This is always a fun time for us volunteers. We get together to make projects for community service, we learn from each other by showing the projects that we made at our annual fall training in Jabez, KY, sharing tips and techniques, we talk and laugh and give each other ideas for more projects to teach in our individual communities, we make a plan of work for the coming year, and we eat! It's always a fun day.
We'll meet again in June to recap our year since the previous June, and to complete our reports of the number of volunteer hours we've accumulated in that span of time. We get inspiration from each other for projects to teach to eager students in our own communities and for sewing workshops we may want to provide. We've become a close-knit group of like-minded sewists, who love sharing our craft with others!
I will begin 2011 with my community sewing group (Sew What?), at the Jeffersontown Public Library on the 4th Thursday of January, with a lesson on how to clean and maintain our sewing machines and sergers. In a class at our volunteer training last fall, I learned some valuable tips on machine cleaning and maintenance that I didn't know before. This is how we share our knowledge with our communities: learning new things at our annual training, then teaching it in our local areas in free classes. That's what Cooperative Extension is all about!
We'll meet again in June to recap our year since the previous June, and to complete our reports of the number of volunteer hours we've accumulated in that span of time. We get inspiration from each other for projects to teach to eager students in our own communities and for sewing workshops we may want to provide. We've become a close-knit group of like-minded sewists, who love sharing our craft with others!
I will begin 2011 with my community sewing group (Sew What?), at the Jeffersontown Public Library on the 4th Thursday of January, with a lesson on how to clean and maintain our sewing machines and sergers. In a class at our volunteer training last fall, I learned some valuable tips on machine cleaning and maintenance that I didn't know before. This is how we share our knowledge with our communities: learning new things at our annual training, then teaching it in our local areas in free classes. That's what Cooperative Extension is all about!
Subscribe to:
Posts (Atom)